 1")
[Get the best value permanent bracelet kit on Amazon today!]
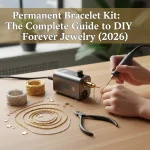
# Permanent Bracelet Kit: The Complete Guide to DIY Forever Jewelry (2026)
Permanent bracelets, also known as forever bracelets, are all the rage right now. The idea of a clasp-free piece of jewelry that you can wear day in and day out, without ever taking it off, is incredibly appealing. But what if you could skip the appointment at a fancy jewelry store and create your own permanent bracelet at home? That’s where the permanent bracelet kit comes in.
This guide will walk you through everything you need to know about **permanent bracelet kits**, from what they are and what they include, to how to use them safely and effectively. By the end of this article, you’ll be ready to create your own stunning, personalized forever jewelry right in the comfort of your own home. Get ready to sparkle!
[Browse top-rated permanent bracelet kit on Amazon]
## What is a Permanent Bracelet Kit?
A **permanent bracelet kit** provides you with all the necessary tools and materials to create a welded bracelet that doesn’t require a clasp. Instead of fastening, the ends of the bracelet chain are fused together, creating a seamless and lasting piece of jewelry. These kits are designed for DIY enthusiasts who want to explore jewelry making and create custom pieces without the commitment of a professional jeweler.
While the term “permanent” might be a bit of a misnomer (you can always cut the bracelet off if needed!), these bracelets are designed to be worn for a long time, becoming a part of your everyday style.
[Browse top-rated permanent bracelet kit on Amazon]
## Why Choose a DIY Permanent Bracelet Kit?
There are several reasons why you might opt for a DIY permanent bracelet kit instead of going to a professional jeweler:
* **Cost-Effective:** Permanent bracelets at jewelry stores can be quite expensive, often costing hundreds of dollars. A kit allows you to create multiple bracelets for a fraction of the price.
* **Customization:** With a kit, you have complete control over the design, chain type, and any charms or embellishments you want to add.
* **Convenience:** No need to book an appointment or travel to a specific location. You can create your bracelet whenever and wherever you like.
* **Fun and Creative:** DIY projects can be incredibly rewarding. Creating your own permanent bracelet is a fun and engaging activity that allows you to express your creativity.
* **Perfect for Gifting:** Imagine the joy of gifting a personalized, handmade permanent bracelet to a loved one! It adds a special touch that store-bought jewelry can’t replicate.
[Browse top-rated permanent bracelet kit on Amazon]
## What’s Included in a Typical Permanent Bracelet Kit?
The contents of a **permanent bracelet kit** can vary depending on the brand and price point, but most kits include the following:
* **Welding Machine:** This is the heart of the kit. It’s a small, handheld device that generates a spark to fuse the chain ends together.
* **Welding Shield:** Safety first! The shield protects your eyes from the bright flash of the welding spark.
* **Chain:** Most kits include a selection of delicate chains in various metals like sterling silver, gold-filled, or stainless steel.
* **Jump Rings:** Tiny rings used to connect charms or embellishments to the chain.
* **Practice Material:** Typically, a small piece of scrap metal or chain to practice your welding technique before working on the actual bracelet.
* **Tools:** This may include pliers, tweezers, and a chain cutter to help you manipulate the chain and jump rings.
* **Cleaning Supplies:** A polishing cloth to keep your bracelet shining.
* **Instructions:** A detailed guide on how to use the kit and create your permanent bracelet.
[Browse top-rated permanent bracelet kit on Amazon]
## Step-by-Step Guide to Creating Your Own Permanent Bracelet
Now, let’s get to the fun part! Here’s a comprehensive guide on how to use a **permanent bracelet kit** to create your own stunning forever jewelry.
### Step 1: Gather Your Supplies and Prepare Your Workspace
Before you begin, make sure you have all the necessary components from your kit laid out and ready to use. Choose a well-lit and ventilated workspace. Cover your work surface with a protective mat to prevent any accidental damage.
### Step 2: Practice Your Welding Technique
This is a crucial step! Before you work on your actual bracelet, take some time to practice your welding technique on the provided scrap material. This will help you get a feel for the welding machine and ensure you’re comfortable with the process.
* **Turn on the welding machine:** Follow the manufacturer’s instructions to power on the device.
* **Adjust the settings:** Most machines have adjustable settings for power and pulse. Start with the lowest setting and gradually increase it until you achieve a clean weld.
* **Position the welding tip:** Place the tip of the welding machine directly over the point where you want to fuse the metal.
* **Press the trigger:** Briefly press the trigger to generate a spark. You should see a small flash and the metal should fuse together.
* **Inspect the weld:** Check the weld to ensure it’s strong and secure. If it’s weak or incomplete, try again with a slightly higher power setting.
### Step 3: Measure and Cut the Chain
Wrap the chain around your wrist to determine the desired length. Add about half an inch to allow for movement and comfort. Use the chain cutter to carefully cut the chain to the correct length.
### Step 4: Attach Jump Rings (Optional)
If you want to add charms or embellishments to your bracelet, now is the time to attach the jump rings. Use pliers to gently open the jump ring, attach the charm, and then close the jump ring securely.
### Step 5: Position the Chain Ends for Welding
This is the most delicate part of the process. Carefully position the two ends of the chain together, ensuring they are aligned perfectly. You can use tweezers to hold the chain in place while you weld. Make sure the jump ring (if used) is not in the way of the welding point.
### Step 6: Weld the Chain Ends Together
Put on your welding shield to protect your eyes. Position the welding tip directly over the point where the chain ends meet. Briefly press the trigger to generate a spark and fuse the metal together.
### Step 7: Inspect the Weld and Reinforce if Necessary
Carefully inspect the weld to ensure it’s strong and secure. If the weld appears weak or incomplete, you can reinforce it by welding the area again.
### Step 8: Clean and Polish Your Bracelet
Use the provided polishing cloth to clean and polish your bracelet, removing any residue or discoloration from the welding process. This will help your bracelet shine and look its best.
### Step 9: Enjoy Your New Permanent Bracelet!
Congratulations! You’ve successfully created your own permanent bracelet using a **permanent bracelet kit**. Wear it with pride and enjoy the lasting beauty of your handmade jewelry.
[Browse top-rated permanent bracelet kit on Amazon]
## Tools for the Job
To ensure a smooth and successful bracelet-making experience, having the right tools is essential. While most **permanent bracelet kits** come with the basics, here are a couple of recommended products that can significantly enhance your DIY journey:
* **Precision Tweezers:** A good pair of precision tweezers is invaluable for holding and manipulating small chain links and jump rings. Look for tweezers with fine tips and a comfortable grip. The [Beadsmith Bent Nose Tweezers](https://www.amazon.com/Beadsmith-Bent-Nose-Jewelry-Making/dp/B0011YJ196) are a great option, offering excellent control and precision. *These tweezers allow for extremely precise placement during the welding process, reducing the risk of mistakes and ensuring a clean, strong weld.*
* **Magnifying Glass with LED Light:** When working with such small pieces, good visibility is crucial. A magnifying glass with an LED light can help you see the details clearly and ensure accurate placement. The [Carson DeskBrite 200 LED Lighted 2x Power Magnifier](https://www.amazon.com/Carson-DeskBrite200-Magnifier-Crafts-Reading/dp/B003UCODIA) provides excellent magnification and bright, even lighting. *This tool helps prevent eye strain and ensures you can see exactly what you’re doing, resulting in a more professional-looking finish.*
[Browse top-rated permanent bracelet kit on Amazon]
## Pro-Tips for Using a Permanent Bracelet Kit
* **Practice makes perfect:** Don’t get discouraged if your first attempt isn’t perfect. Keep practicing and you’ll quickly improve your welding technique.
* **Safety first:** Always wear the provided welding shield to protect your eyes from the bright flash of the welding spark.
* **Start with simple designs:** Begin with basic chain designs and gradually work your way up to more complex patterns.
* **Use high-quality materials:** Opt for kits that include high-quality chains and components to ensure your bracelet lasts.
* **Take your time:** Don’t rush the process. Take your time and pay attention to detail to create a beautiful and lasting piece of jewelry.
* **Experiment with different charms and embellishments:** Personalize your bracelet by adding charms, beads, or other embellishments that reflect your unique style.
[Browse top-rated permanent bracelet kit on Amazon]
## FAQ About Permanent Bracelet Kits
* **Are permanent bracelet kits safe to use?**
Yes, **permanent bracelet kits** are generally safe to use as long as you follow the manufacturer’s instructions and take the necessary safety precautions, such as wearing the provided welding shield.
* **How long will a permanent bracelet last?**
A permanent bracelet can last for years with proper care. However, it’s important to note that the chain can break or stretch over time, especially if it’s exposed to harsh chemicals
[Check the latest prices and deals for permanent bracelet kit on Amazon today!]


![10 Stunning Lotus Flower Bracelets to Manifest Peace & Serenity [2026]](https://www.bestdancecheer.com/wp-content/uploads/2025/12/gift-ideas-gold-reviews-69-150x150.webp)